Showing posts with label Preparation. Show all posts

Prepare Yourself

Hardware and software requirement


To start working with this tutorial, you need to check whether your computer specification is capable of running SkecthUp and to download SketchUp software, as well as some additional files which I will provide.

Hardware and Operating System

Google SketchUp is released only for Windows XP /Vista/Window 7 and Mac OS X. However, this blog will only deal with the Windows version.
The minimum specifications required to run SketchUp is actually quite low. Minimum requirements for running SketchUp in Microsoft Windows XP are:

  • Processor: 600 MHz Processor (Version 7),  1 GHz  (version 8)
  • 128 MB RAM (Version 7),  512 MB RAM (version 8)
  • Available disk space: 128 MB  (Version 7),  300 MB  (Version 8)
  • 3-D Graphic Card that supports OpenGL version 1.5 or higher
(More information on this link)

Currently, it is very difficult to find computers with such low specification, even from used computers. On-board graphics card with 3-D capability and Open GL 1.5 have been around for quite sometime. Therefore, in general, hardware is not an issue to model with SketchUp. However, the above minimum specification will restrict you from modeling rather large / complex 3d models.

Actually, the computer requirement will depend on the complexity of the model you are making. Most of the time, I use a 1.83MHz Dual Core Notebook, with 1 GB RAM, nVIDIA Graphic Processor On-Board running under MS Windows Vista Business. This is sufficient for my modeling needs.

Up to the current version (version 8.0), SketchUp has not been able to take full advantage of parallel procesing capability of multi core computers. Thus, there is no guarantee that SketchUp will be running faster on a computer with dual core processors compared to a single core one (e.i. Pentium IV).

It is not the case with video card (GPU). SketchUp will definitely works faster if your computer has a dedicated video card (in notebook computer it is often mentioned as dedicated memory for video). Even if it is only 128 MB. It should be noted, it is suggested that the video card should be nVIDIA processor, not ATI nor  Intel

So is with your computer memory (RAM), the bigger the better. The maximum memory is only limited by your operating system. Though, Microsoft Windows XP/ Vista 32-bit can only hold a maximum of 4 GB RAM.

Software Requirement and other files

The only software required is a Google SketchUp (free) for Windows. Actually, you can also install SketchUp Pro from the beginning. You can use the Pro version for 8 hours (usage time) without a license. Thereafter, if you don't enter a valid license key, it will automatically become a free version. But I suggest for the moment, you need to install only the Free version. When you have some mastery with SketchUp, you may need to install the Pro version since there are some features that are only available in Pro Version, such as making neat hardcopies of your model (with scale, annotation, and all).

Download
(All SketchUp 8 documentation and support content is currently maintained online and isn't available for download)

also provide you with some ready made Sketchup components (Quicky). As the name suggest, they can speed up the modeling of your home.

The components are a hinged door component, a sliding door (both can be set a to be a single/double leaf door), a window component that can be configured with each other to have some alternative shapes. Each of this component can be configured down to the jamb/header and rabbet dimensions.

Another Quicky is a stair component (with option for straight and letter-u stair) that can also flexibly be configured to shape the most crazy stair design you can imagine. The final quicky component is a spiral stair components. This will come handy if you want to design a stair in a rather restricted area. Just like a straight/u-shape stair, the height of the each rise, the total height is also configurable to your liking.

All of these components are Dynamic Component, a new breed of component introduced since SketchUp version 7.0. These component can be sized simply by mouse clicks and drags, while maintaing their core specification such as jambs/threads etc. Doors and Window component has opening/closing animation ability for you to play around. A more detaled discussion about this will be available in Quickies Anyone (Part One and Part Two)


Recomendation
Which version?
This blog was prepared using Google SketcUp version 7.x free version, However it is no longer avalailable on their site. I've used the 8 version and confirmed that all the steps and instructions provided in this blog are still valid.
If you are not too sure, you can dowmload and install SkectUp 7.x pro and use it untill the pro trial expires AND also install Sketchup 8 just for the fun of it since different versions can co-exist.

Requirement for Internet Connection

In version 6, SketchUp by default will install several basic components (such as doors, chairs and other items) to our computer (local hardisk). Since SU 7.x, components are no longer stored locally, but are available on demand  from Google 3d Warehouse.

I do not really like this workflow. Up till now I still keep all the components that I like locally. Whenever there is a need for another component, I'll look through the internet (not just on Google 3d Warehouse) and then save it in local a folder. For me, "always on connection" is not required.

Google still provide you with all previous components and materials for you to download and install onto your computer (Sketchup 6 Bonus Pack). This component is 100% compatible with SU Version 7 and above.


Harrynov

The Projects


Copyright Notice
The scenario and designs discussed in the projects are based on a Question and Answer that appears in Consultation Section of Indonesia's Tabloid Rumah Edition: 148/VI, November 2008. This reference is based on a high appreciation to the architect that can provide with excellent solution in regard with restriction of available land.

In this tutorial, we will try to learn to use SketchUp to step-by-step "build" a new house and later “renovate” the house. In order to do so, we will separate the modeling into two projects:

  1. Project I : Building a two bedroom house.
    Tip & Trick

    Kompas
    For layouting and editing purposes, it is assumed that the house is facing South.

    It is assumed that we are going to build the new house from square one:

    1. Adding walls and floors.
    2. Installing doors and windows.
    3. Adding roof and ceiling.
    4. Adding details and other ornaments.
    5. Doing finishing work such as adding floor tiles, painting and a little landscaping.
  2. Project II : House Remodeling

    The remodeling job will include:

    1. Adding another floor
    2. Adding more room and renovate existing bedrooms.
    3. Remodel the roofing.
    4. Create a better façade.

Project I : A Little house in .........

Denah

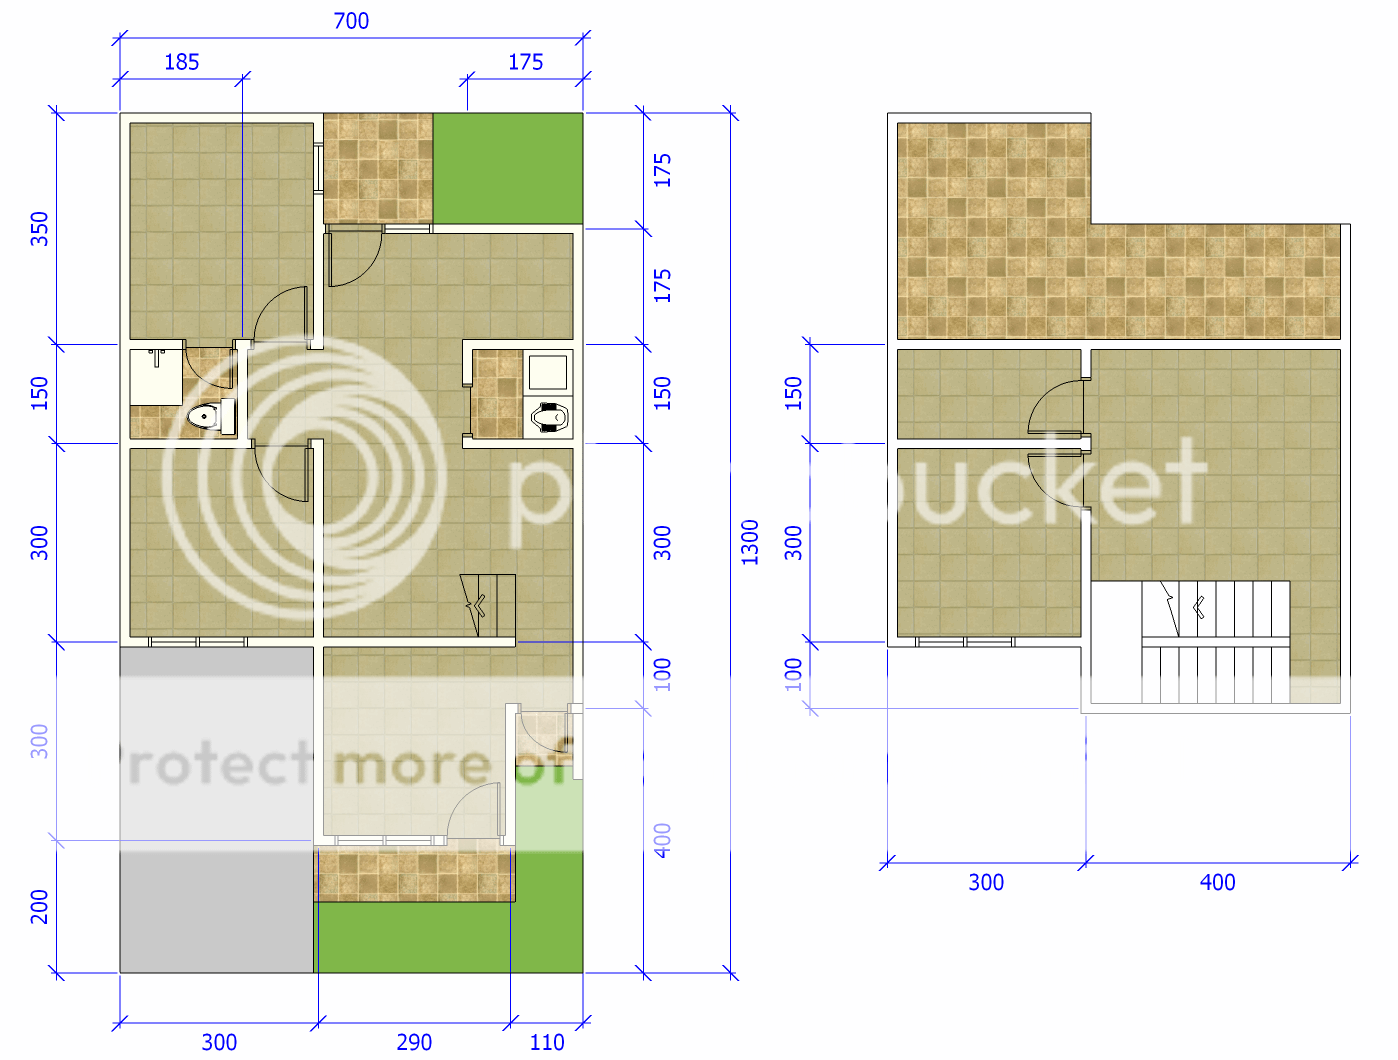
The initial model is a type 36 house on  7×13m land with following details:

  1. Two bedrooms.
  2. A multipurpose room that includes living room, family room, dining room and a kitchen.
  3. One bathroom.
  4. Front and rear terraces.

Specifications and other details, such as the height of the walls and floors, will be explained thoroughly when we model the corresponding objects.

Detailed floor plan of the building can be viewed by clicking the floor image.

Project II : A Nice Compact House

The remodeling / rooms addition are as follows:

  1. Another service door
  2. Living Room
  3. One bedroom
  4. One master bathroom
  5. A Storage room
  6. Kitchen Area
  7. A small garden
  8. Laundry room/area
  9. A staircase

Solution given in the magazine is reflected in the following floor images.

Denah


Apart from the dimensions given above, all shapes and dimension used in the model are based solely on my humble interpretation to the illustrations provided in the tabloid.

Here is a 360° visual image of  3D model home after renovation.

360degree
 360° view of the 3D model of the final Stage 

I believe the design solution not only has been able to meet the expectation of the requester but it also still allows some more rooms addition on the second floor

Futher modification and development

When the final 3-dimension model is completed, you can analyze the position of the staircase since some of the stair treads and landing are protruding into the front room. You can study how it effects people sitting in the room and what furniture to use in the area to compensate such stair shape.

You could also consider removing the wall between the front room with the living room and replacing it with some type of a divider to maintain privacy. You can also experiment by replacing the u-shape stair with a spiral stair and place it somewhere in the back.

Using SketchUp, everything can be done easily and analyzed thoroughly without having to place a single brick.

Harrynov


A Fresh Start

... New to SkecthUp ...

Installing Google SketchUp

There is no special settings required during SketchUp installation, simply run  GoogleSketchUpWEN.exe and follow all instructions on the screen. Select installation folder as suggested by the installation program.

Because Sketchup is a free program, you do not need to enter any serial key number or to follow specific activation procedure. You are only required to accept the term of use.

That's all there is to it.

Prepare the Working Folders

Folder

You need to prepare a few folders to manage files created and downloaded during modeling with this tutorial (see in illustration)
Folder "\Sketch" will be used for SketchUp (*. skp) files we create. Sub-folders "\Components" will be used to store downloaded and created components, and Subfolders "\Quickies" will be used to store Quickies Components

Detail in how to download and store all the component to their corresponding folder will be provided at Freebies: Quickies and other Freebies postings.

Running SketchUp for the First Time

The first time you run Sketchup,  you must choose one of the available templates. Templates are files that store various settings of the modeling environment such as units of measurement and screen style . 

Tip & Trick
Who is Sang
Sang is the figure that appears when we start a new model. This 5'9 tall "(175 cm) person can be used as a guide to position and determine the size of the first object you create. You can delete Sang afterward.

Select "Simple Template-Meter"as the initial template (we will customize this later).

Uncheck "Always show on start-up" at the pop-up  "Welcome To SkecthUp"  screen in order to prevent it from reappearing. 

After clicking [Start Using SketchUp] button, the followin screen  will appear. This is your design desk.  A popup will also appear (Instructor) that briefly describes some SketchUp concepts. Read on or you can immediately close it because we will discuss the concept in lot more depth later on.

sang

The above picture shows the three main elements of SketchUp that we will use intensively during a modeling:

  1.   Main Axes (Red, Blue and Green)
  2.   Toolbars, and
  3.   Measurement Box
1. Main Axes

Main axes are the three colored lines are used as a virtual axis of the model we make. The position of the axes above are not related to the building orientations. Generally, the modeling is almost always begins with 0 point Axis, the crossing point of the three axes, and front side of the model is facing towards us.

Main Axes Color Convention

  • Red Axis indicates X axis to display left and right of object
  • Blue Axis indicates Y axis  to display up and down
  • Green Axis indicates Z axis to display front and rear of models.

Setting the real orientation of a building is done by entering North Angle value, where as a value of 0 indicates the building is facing South and a value of 90 indicates the building is facing East. This is needed primarily to simulate the fall of the sun/shadows on the building. The simulation is accurate as per the minute of a certain date, as long as the building location is also provided. You can select one of the predefined location or you can enter specific Latitude and Longitude values manually with the help of Google Map or Google Earth or even a GPS. (More of this concept is discussed in General section)

2. Toolbars.

Majority of our communication with SketchUp is done through toolbars. By default SketchUp will display only the Getting Started toolbar as shown in the above picture. There are many toolbars that can be displayed.  Step by step, we will add more toolbars as needed.

3. Measurement Box.

One important aspect of modeling is the setting of dimensions of whatever objects we are adding to our model. In SketchUp almost all dimension can be determined by means of clicking & dragging with the mouse and the result is shown in the Measurement Box. In this way, modeling will be made very quickly, but not necessarily accurate.

Tip & Trick
Measurement Box
Measurement box is used to display measurement(s) of object we are creating. For example when we select Circle tool, the measurement box will display the number of side/segments the circle will be constructed and after  we click a position, it will display the radius of the circle.
Measurement box main purpose is to set dimensions and other parameter by keying the a number  to change the displayed value. This will ensure accuracy of the model.

You can use Measurement Box to make object dimension and position accurate by typing in the desided number(s)/length through the keyboard.

Unit used in Measurement Box is in agreement with the choice of measurement units that you have set in Model Info. However, you can enter any type of unit of measurement as long as you add the appropriate notation. For example, if you want to make a circle to make 2.5-inch pipe, simply type in [2.5"] and press [Enter]. Automatically SketchUp will convert the measurement into whatever unit you previously set. No need for any calculator to convert measurements.

Setting the Model Environment Model

Before we use SketchUp, we need to modify some settings, so that everybody will have the same modelling environment setting in order to obtain relatively similar input/output.

When we first run SketchUp, we chose one of Simple templates. We need to make some adjustment before we move on with the modeling.

Changing Units and Dimensions

Unit of Measurement and Display Dimensions can be changed through Model info window that can be accessed via menu Window -> Model info.

Change UnitChanging measurement units will not modify the dimension of the objects that are already in the model. 

Change the settings of Units by changing the highlighted fields with values shown in the following figure.
This change is made in order to reduce the number of digits that must be typed in when setting objects' dimension, and in order to the have a neater display if we want to show dimensions of objects. 

Change DimensionIn relation to that, we can change the look of the standard dimensions of the "Align to Screen" (the numbers are always facing the screen) to line with the objects measured.
With this appearance, dimensions are displayed neater and the 3d effects is also reflected in the dimension display.

Change the value of the highlighted fields with values as shown in the above figure. Appearance of dimensions  can be changed individually anytime directly to the object.

Style Setting

Style Style settings is used to change how the model is displayed on screen. Every aspects of display such line shape and color, background, ground and sky color, can be modified to your liking. Normally, during adding and editing objects, we use one of the Default Styles. My style of choice during this stage is the Engineering style (sharp lines with white background) Every other style is only used mostly during presentation or to create fancy printouts of your model.
The above picture uses one the available styles to make the model as if it were drawn by hand using pencil and stationary paper with a pretty hard line strokes. Style settings does not affect objects’ attributes, other than their look on the screen.

Change Dimension You can modify every element of a Style using Styles Window than can be accessed from menu Window -> Styles. Regardless of your style selection, during modeling, it is recommended we make objects look sharp and the line is not too thick. Change the Edge setting by clicking the highlighted symbol at the Edit Tab and make all other highlighted settings as shown in the figure.

Of course you can experimen with various settings to see which one best suits your taste. 

Saving Environment Setting Permanently

The above modification applies only to your current model. If you create a new model, it will use the default template.

Change UnitIf you want to save this style setting permanently and to make it as the default template then activate Save as Template window from menu File -> Save as Template. Change the content of the window similar to the following figure.

The default template will also store every existing object included in the model. I suggest that at this early stage you don’t delete the SANG character.

Toolbar Docking

As mentioned previously, majority of our communication with SketchUp is done through the toolbars. Various toolbars have been provided and organized according to function groups.Change Dimension

Initially, SketchUp only displays Getting Started toolbar. This toolbar is meant for introduction purposes only. It combines several different groups of functions into one toolbar. This toolbar should be replaced with more consistent grouping of toolbars to make tools easier to find. For beginners, I recommend that only some of this toolbars be displayed so as not too confusing. For a start, select toolbars shown in the above pictures to always show using menu View -> Toolbars  and unselect Getting Started toolbar.

Tip & Trick
Docking Toolbars
Normaly, instread of floating, every toolbar is docked onto one side of the Sketchup Screen. Any of the four sides of the screen can be used to dock toolbars. My toolbars are arranged this way: Toolbar associated with editing and construction are docked on the left side, while toolbars associated with view are docked on the upper side the screen. At the bottom side, I sometime dock toolbars that are rarely used such as Shadow.

Now you are ready. Grab a drink! We'll be too busy very soon.


Harrynov