Prior to adding a roof, we will add a few details to the model we have created:
-
Adding details to the bathroom.Previous 3D Model Chapters in a project are expected to be done in chronological order. However, if you want to start from this chapter, please download the last model created from previous lesson(s) from the 3D warehouse.
- Adding front terrace
- Adding details to the front bedroom windows.
- Creating rear terrace.
Detailing the Bathroom

In this tutorial, there are only two objects reside in the bathroom: a toilet and a shower corner. Both are downloadable from Google 3D Warehouse. (See: Freebies: Bathroom Components).
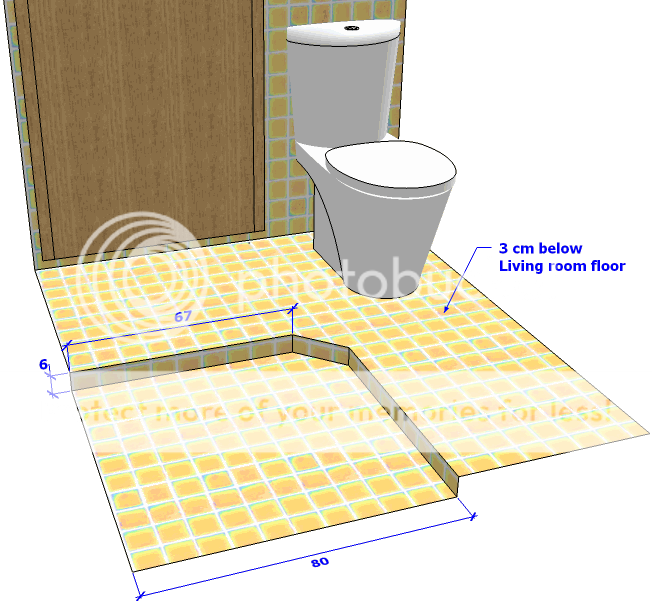
As usual, in order to prevent water from spilling out, the bathroom floor is always lower than outside floor. At the shower corner area, the floor is also lower than the rest of the floor, so the bathroom will be relatively dry.
-
Changing the field of view
Editing in a very small space, just like this bathroom, is not easy because most of the time our view will be blocked by walls. One way to overcome this is to widen our view by increasing the field of view. The effect is similar with viewing through a wide lens camera. From the same distance, area included in our view will be wider. However, just like in photography, the wider the lenses, the more distorted the object will appear.Tips and Trick Field of View (FoV)
By default, SketchUp will provide you with a 35° perspective. This is assumed to be the "normal" perspective of human eyes. The number can be set between 1° and 120°. The main reason we have a larger FoV is that we can set our view closer to objects while keeping more object(s) in our view. Therefore, the camera can be moved more freely in a small space. However, the farther the camera from the object(s), the more distorted they appear.
FoV can be modified from menu Camera -> Field of View. Type in the desired number using your keyboard and press enter.
Change the Field of View (FoV) to 60° and set your view so the whole bathroom floor and the bathroom door can be seen clearly. Later in this tutorial, we will revert our view back to 'normal'.
-
Lowering the bathroom Floor
The bathroom floor is 3 cm lower than the living room floor. In order to do that, we need to isolate the bathroom floor from the rest of the floor by adding a line along the inner side of the door using Line tool.
Afterward, we will push the
floor by 3 cm using Push/Pull
 tool.
tool.

Animated Tutorial - Lowering the bathroom floor. -
Detailing the bathroom.
The shower corner floor is 6 cm below the bathroom floor, with an area measuring 80x80 cm. The shape of the floor is not completely a square. We will first create a rectangle measuring 80x80 cm using the Rectangle
 tool.
Then, using the Line
 tool,
we will add a sloping line to
finalize the shape. When the shape is completed, we will push the face
by 6 cm using the Push/Pull
 tool.
tool.
-
Placing the toilet and the shower corner set.
If you have not downloaded the toilet and table components, please open Freebies: Bathroom Components for links and saving folder.
The toilet component must be positioned so its back will rest at the middle of the remaining wall next to the bathroom door. Place the component toilet somewhere in the middle of the bathroom floor and rotate it so it will have the appropriate orientation. Then, move the toilet using the designated wall as the reference.Tip & Trick Zoom-in and Zoom out
 If points/intersections are too small
to select, you can Zoom-in / Zoom-out your view
using the mouse Scroll Wheel. The zooming will not affect currently
active tool/objects.
The shower corner set will also need reorientation. Place the component in the middle of the bathroom floor. Rotate the component so the shower head/tap will be placed on the bathroom south wall. Then move the component so the curtain rod will be attached to each wall.

Animated Tutorial - Detailing the bathroom -
Restore Field of View setting back to 35°.
Restore the FoV to 35 using similar steps as detailed in (1) so the view is back to the "normal" perspective.
Adding the Front Terrace
 The front terrace is designed to look as
illustrated in the image. The terrace consists of three main objects:
 - The floor, including a small step on the west side to enter the terrace
- The roof terrace made of concrete cast. The roof width is the same with the width of the front/door window.
- Two terrace posts with connecting overhead beam to appear like a gate.
For easy editing/modification, all the three main objects will be made into one group so editing this object will not effect any of the surrounding objects.
-
Preparing a initial shape for the terrace.

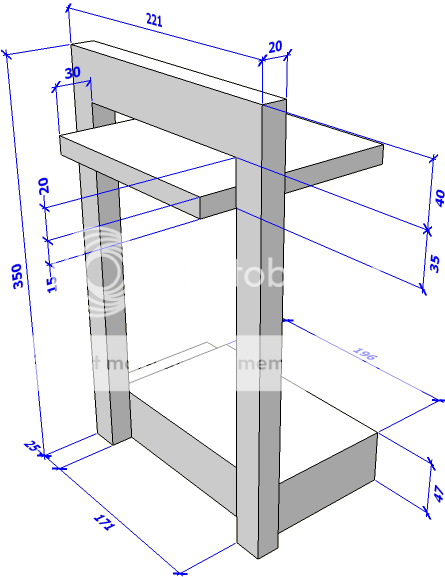
We are going to use floor and roof terrace as the initial reference. To ease placements and sizing of objects, we will prepare a box (colored in blue in the adjacent image) with the following measurement:
- Length is similar to the floor length of 120 cm.
- Width is exactly the same with front door and window
widths which is 171 cm.
- Height is based on the lower part of the roof cast which is 275 cm above Point zero.
 tool and Push/Pull
 tool.
However, we want to apply Grouping technique so new object(s)
will be isolated from existing walls, windows, etc, therefore, editing
will be done without fear of unintentional modification to these
existing
objects.

Animated Tutorial - Creating initial "block" for the front terrace - Length is similar to the floor length of 120 cm.
-
Creating Floors, Roof and Column Elements
 Measurement
details of each terrace elements are shown in the illustration. We are
going to make the elements within the group we created earlier.
Notice that, of the three terrace elements, the column element touches both the floor and the ceiling. Therefore, we are going to make the columns also as a group so each elements can easily be edited without disturbing any other element.
We would first make the front face of the box a group. Then create the terrace roof and floor and finish the column elements of the terrace.
For the purpose of the animation efficiency, we will start editing the columns though the roof and the floor are not completely done.
Animated Tutorial - Finishing all the terrace elements.
Adding ornamental detail to the front bedroom windows
 Detail shape and
dimensions of the
front window ornaments are shown at the following picture.
There will be no detailed steps for adding ornamental detail to the front bedroom window. Since the process itself is quite simple. The tools required during this process are the Rectangle
 tool
and the Push/Pull
 tool.
tool.
The key is, after a rectangle is created, the dimensions are immediately entered using the measurement box to obtain the required dimensions. You can use double click to repeat a pulling operation when creating the vertical ‘pole’ of this window ornament.
You can watch the modeling process on the following animation.
 |
| Animated Tutorial - Adding ornamental detail to the bedroom windows. |
Rear terrace detail
 There
are not many details for the rear terrace. We just need to add a 160x80
cm floor. To avoid rain water from spilling into the house, the terrace
floor will be 3 cm lower than the interior floor.
This floor area will be covered by main roof, so no additional roof is
required.
There
are not many details for the rear terrace. We just need to add a 160x80
cm floor. To avoid rain water from spilling into the house, the terrace
floor will be 3 cm lower than the interior floor.
This floor area will be covered by main roof, so no additional roof is
required.No detailed steps will be provided to add this terrace.
We have accomplished ....
| No | T o p i c s |
|---|---|
| 1 | Changing Field of View (FoV) so editing an object can be done in close distance without being obstructed by other objects. |
| 2 | Separating a flat surface using the Line tool. |
| 3 | Entering value(s) using the measurement box using Windows format |
| 4 | Fetching components from the Google 3D Warehouse. |
| 5 | Placing an object/component at the middle of a face using Midpoint reference. |
| 6 | Creating a new object as a group so its entities will be isolated from surrounding objects outside the group, and editing will not disturb those objects. |
| 7 | Using Push/Pull tool to create a new face. |
| 8 | Creating a group within another group (nested group) |
| 9 | Creating a line using the Line tool utilizing main axes inferences. |
| 10 | Entering and exiting group using the Select tool. |
 By now, we have completed all the floor and
wall elements of the house. The next step of the tutorial is adding a
roof and
adding some finishing material to the floors and the walls so the model
will
appear more realistic.
By now, we have completed all the floor and
wall elements of the house. The next step of the tutorial is adding a
roof and
adding some finishing material to the floors and the walls so the model
will
appear more realistic.Cheers
Harrynov


 tool
and press [Del] to cancel the
healing in the area.
 tool
and click at the bottom line
of the east wall to create a guide line.
 tool
to finish the wall corner shape.
0 comments:
Post a Comment